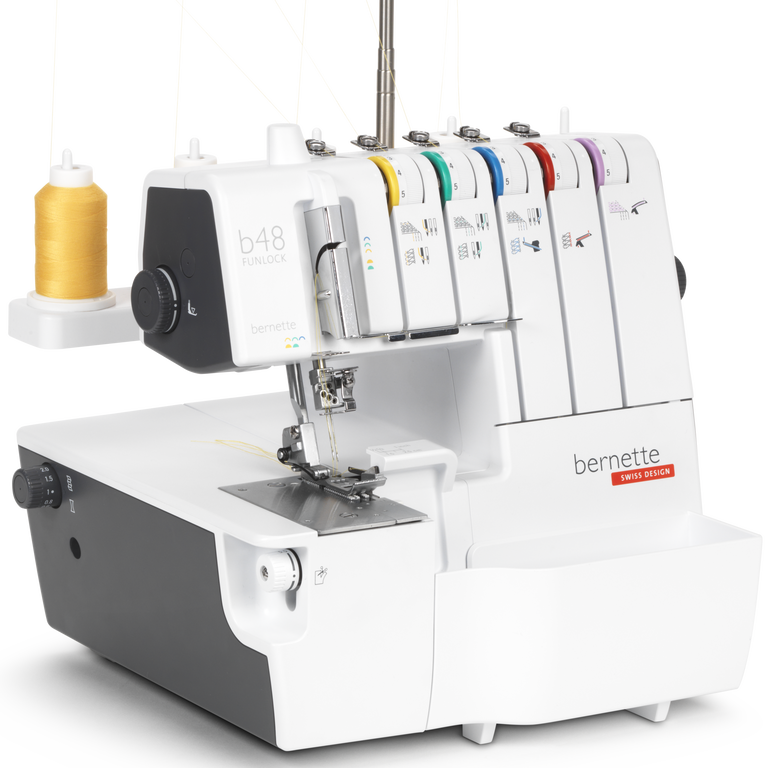
bernette 48 FUNLOCK
N. articolo 5240007106
895.00 CHF
Disponibilità nel negozio online:
  • Disponibile

bernette 48 FUNLOCK
N. articolo 5240007106
bernette 48 FUNLOCK image number

Descrizione del prodotto


Descrizione

La tua compatta macchina combinata, che cuce, taglia e rifinisce in un solo passaggio, così ogni cucitura spacca.

Caratteristiche

  • Cuciture overlock a 2, 3, 4 e 5 fili
  • Punti overlock larghi: 3-7 mm
  • Punti di copertura larghi: 2,8 / 5,6 mm
  • Punti combo larghi fino a 10 mm
  • Punti orlo arrotolato: 1,5 mm
null

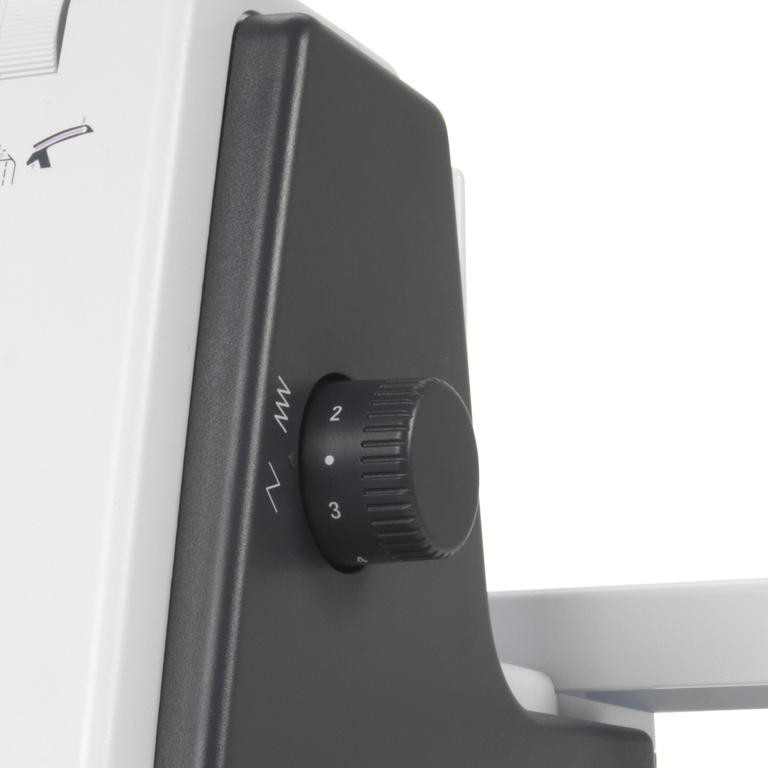
Un'ampia gamma di punti per bellissime cuciture


La tua bernette 48 FUNLOCK presenta un'ampia gamma di punti. Cuciture di sicurezza o orli con punti della tagliacuci, punti di copertura, punti come super stretch per materiali altamente elastici, cuciture piatte, cuciture arrotolate, orli arrotolati o punto a catenella: le possibilità con la bernette 48 FUNLOCK sono quasi illimitate.

null

Infilatura semplificata


L'infilatura è molto semplice se segui i percorsi di infilatura del codice colore della bernette 48 FUNLOCK. L'infilatura è agevolata anche da un infilatore dell’ago separato e da un meccanismo di infilatura del crochet.

null

Area di lavoro più ampia per grandi progetti di cucito


Con i suoi 87 mm di area di lavoro, la bernette 48 FUNLOCK garantisce tantissimo spazio per progetti di cucito più grandi. Un'altra funzione è la luce a LED luminosa, che assicura una buona illuminazione dell'area sotto l'ago.

null

Velocità di cucito elevata per un funzionamento efficiente


La bernette 48 FUNLOCK consente di cucire linee diritte molto rapidamente. Con una velocità di cucitura di fino a 1300 punti al minuto e punti precisissimi, i progetti di cucito prendono forma nel minor tempo possibile.


Funzioni

Pedale elettronico
Misure della macchina L / L / H [mm]
360 300 290
Peso della macchina [kg]
7,800 g
Lunghezza del braccio libero a destra dell'ago [pollici / mm].
87 mm
Altezza dello spazio di lavoro [pollici / mm]
60 mm
Porta bobina [numero]
5
Motore principale, tipo
AC
Velocità di cucitura massima [spm]
1,300 spm
Spazzola per polvere
Assortimento aghi
Rete per rocchetti di filo superiori
Macchina parapolvere
Scatola per accessori

Tutorials

b48 + b44 + b42 Tutorial – Preparation (1/15)
Further information is available at http://www.mybernette.com Do you want to start using your b48, b44 or b42 for the first time? In our video tutorial, we show you the first steps. How do you attach and align the thread stand and the thread guide holder correctly? How do you connect the mains cable and the foot control, and where is the looper cover, as well as the accessories stored inside it? This basic information will help you get to know your overlocker and prepare for your first sewing project!
b48 + b44 + b42 Tutorial – Preparation (1/15)
b48 + b44 + b42 Tutorial – Rethreading (2/15)
Further information is available at http://www.mybernette.com In this video tutorial for your b48, b44 or b42, you will learn important basic information about rethreading, such as: when do you use the spool stabilizers? How can you tie directly onto threads for easy rethreading? How do you separate the thread chain, how do you pull the needle threads through first and then the separate looper threads?
b48 + b44 + b42 Tutorial – Rethreading (2/15)
b48 + b44 Tutorial – Overlock threading (3/15)
b48 + b42 Tutorial – Coverstitch/chainstitch (10/15)
b48 + b44 Tutorial – Thread tension and overlock stitch optimization (5/15)
Further information is available at http://www.mybernette.com The appearance of the overlock stitches on your b48 or b44 is influenced by the type of fabric, the thread, the needles, stitch length and differential feed. To allow the threads to interlock loosely, first loosen one thread tension before you tighten another. In this video tutorial, we show you how to control and optimize the thread tension for the various types of overlock stitches. We show you what details you should consider for the following stitches: 4- and 3-thread overlock and 3-thread narrow seams, 3-thread roll hems, and 3-thread flatlock stitches.
b48 + b44 Tutorial – Thread tension and overlock stitch optimization (5/15)
b48 + b44 + b42 Tutorial – Stitch length and differential feed (7/15)
b48 + b44 Tutorial – Stitch width, cutting width, rolled hem (8/15)
b48 + b44 Tutorial – Upper looper converter (9/15)
b48 + b44 Tutorial – Basic overlock settings and sewing test (4/15)
Further information is available at http://www.mybernette.com With the help of this video, you can try out your first overlock stitch sewing test on your bernette 48 or bernette 44. What basic settings do you need to sew your first stitches? What do the thread tension, stitch length and differential feed do? How do you set the knife to the correct position, and how do you use the roll hem lever and presser foot pressure? When you have laid all the threads from the looper eye and the needle eye under the presser foot, lower the foot and you can slowly start to sew. The excess seam allowance is automatically cut off during the process.
b48 + b44 Tutorial – Basic overlock settings and sewing test (4/15)
b48 + b44 + b42 Tutorial – Changing the needles and needle threader (6/15)
Further information is available at http://www.mybernette.com This video tutorial shows you how to change the needles on your b48, b44 or b42, and how to use the needle threader. When you open the looper cover, you will find a needle holder and an appropriate screwdriver. To change a needle, first loosen the needle screw slightly. When you then wiggle the needle slightly, it will come out. Now insert the new needle into the needle clamp and push it all the way up into the correct position. You can then tighten the needle screw again. The video continues showing the use of the needle threader, which you orient with the notch up. You can then insert the thread horizontally and guide it along the needle groove with little pressure until the thread is guided through the needle eye. Now you can pull the thread through the eye of the needle with ease.
b48 + b44 + b42 Tutorial – Changing the needles and needle threader (6/15)
b48 + b42 Tutorial – Coverstitch/chainstitch: basic settings and sewing test (11/15)
Further information is available at http://www.mybernette.com Would you like to carry out your first sewing test using coverstitch or chainstitch on your b48 or b42? Coverstitch is ideal for sewing hems, for example on elastic materials. In this video tutorial, we take you through the process, from the basic settings to sewing for the first time. First, we check the thread tensions, the stitch length setting, the differential feed setting and the presser foot pressure. Then we cut back the looper thread and make sure that the needle threads are not twisted. Now we start sewing, using the markings on the cover as guidelines. The first stitches are secured by the subsequent stitches, it is up to you to secure the last stitches manually.
b48 + b42 Tutorial – Coverstitch/chainstitch: basic settings and sewing test (11/15)
b48 + b42 Tutorial – Stitch optimisation for coverstitch and chainstitch (12/15)
b48 Tutorial – Converting from overlock to coverstitch/chainstitch (13/15)
b48 Tutorial – Basics of combo stitches (14/15)
b48 + b44 + b42 Tutorial – Maintenance (15/15)
Further information is available at http://www.mybernette.com It is important to take a little time to regularly clean and maintain your b48, b44 or b42, because during sewing and cutting, fabric, thread and, of course, dust residues build up. In this video tutorial, we show you how to care for your bernette properly. When you open the looper cover, you will find a brush. In the accessory box you will also find a screwdriver and the overlock machine oil. The video shows you exactly how to remove the presser foot and the stitch plate to clean your machine in this area. We then show you which parts you can oil and what to do to make sure the oil is well distributed.
b48 + b44 + b42 Tutorial – Maintenance (15/15)