bernette 44 FUNLOCK
Art. Nr. 5240005106
595.00 CHF
Verfügbarkeit im Online Shop:
  • Verfügbar

bernette 44 FUNLOCK
Art. Nr. 5240005106
bernette 44 FUNLOCK image number

Produktbeschreibung


Beschreibung

Deine kompakte Overlockmaschine für saubere Nähte, die deine Projekte von Webware bis Stretch lässig ins Ziel bringt.

Besonderheiten

  • 2-, 3- und 4-Faden-Overlockstiche
  • Breite Overlock-Stiche: 3-7 mm
  • Breite Rollsaum-Stiche: 1,5 mm
  • Helles LED-Licht
  • Nähgeschwindigkeit bis zu 1300 Stiche/Minute)
null

Schöne Overlock-Nähte, auch für Anfänger


Die bernette 44 FUNLOCK kannst du auch als Anfänger einfach bedienen, denn die 15 verschiedenen Stiche mit 2, 3, oder 4 Fäden sorgen für die grösste Flexibilität bei der Stichauswahl. Dabei erzielst du jederzeit eine professionelle Stichqualität. Neben den 2-, 3- und 4-Fadennähten kannst du deine Nähprojekte auch mit exzellenten Rollsäumen mit einer Breite von bis zu 1,5 mm versehen.

null

Einfaches Einfädeln


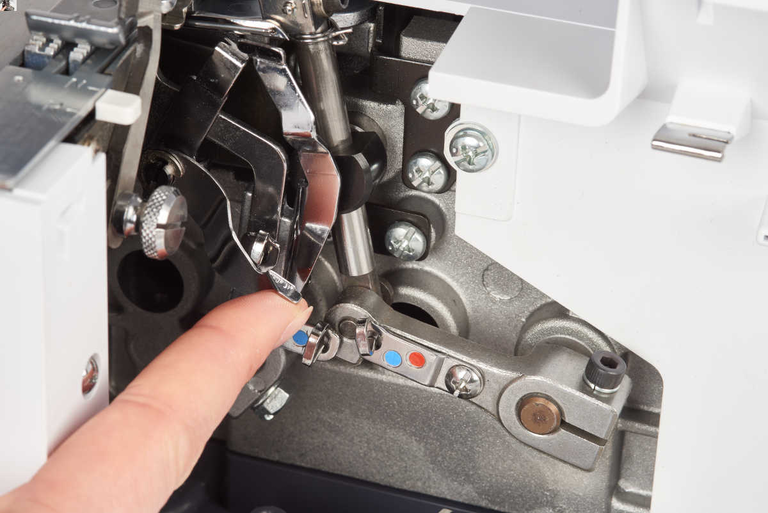
Durch den farbig markierten, offenen Fadenweg kannst du deine bernette 44 FUNLOCK ganz einfach einfädeln, indem Du nur den Farbmarkierungen folgst. Separater Nadeleinfädler und Untergreifereinfädelmechanik erleichtern das Einfädeln zusätzlich.

null

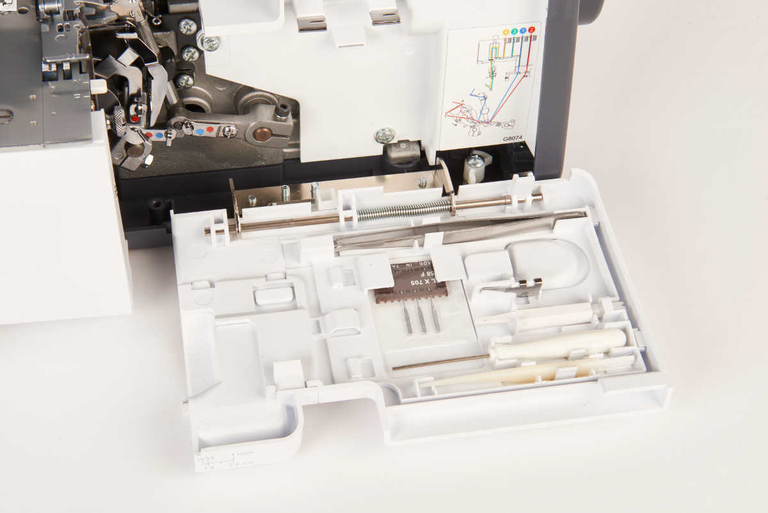
Viel Platz für Dein Zubehör


Das wichtigste Overlockzubehör hast du jeder Zeit griffbereit im Greiferdeckel. Weitere Zubehöre sind in einer separaten Box verstaut.

null

Präzises und flexibles Overlocken


Mit der bernette 44 FUNLOCK nähst du auch bei 1300 Stichen pro Minute immer schön gleichmässig. Dabei näht und schneidet deine Overlock-Maschine auch dickeren Stoff mit Leichtigkeit und Präzision und das in einem Schritt. Die abgeschnittenen Nahtzugaben landen beim Nähen in dem Stoffauffangbehälter, den du mit der bernette 44 FUNLOCK erhältst.

null

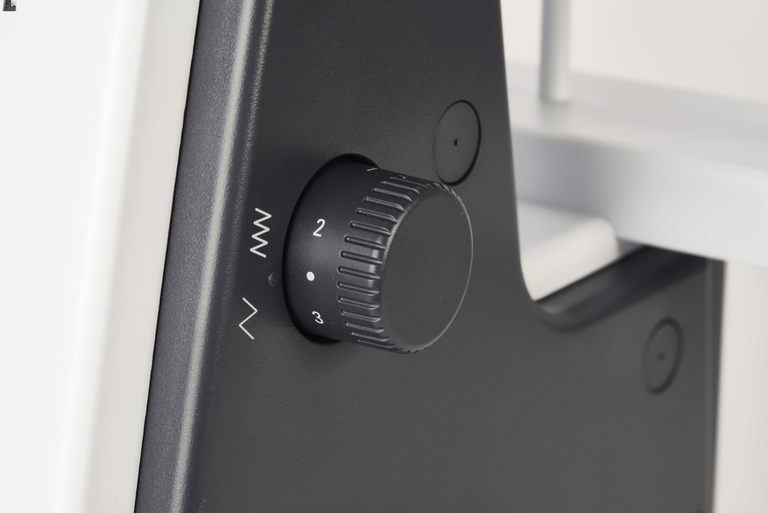
Wofür brauchst du den Differentialtransport


Der Differentialtransport sorgt stets für wellenfreie Nähte bei Strickwaren und für kräuselfreie Nähte bei feinen Stoffen. Je nach Einstellung zwischen 0.6 und 2 können aber auch gezielt Kräuselungen erzeugt werden, z.B. für dekorative Rüschen.


Merkmale & Funktionen

Elektronischer Fussanlasser
Abmessungen der Maschine L / B / H [mm]
336 263 294
Gewicht Maschine [kg]
7,200 g
Freiarmlänge rechts von der Nadel [Zoll / mm]
87 mm
Höhe des Arbeitsbereichs [Zoll / mm]
60 mm
Spulenhalter [Nummer]
4
Hauptmotor, Typ
AC
Maschinentyp
mechanisch
Maximale Nähgeschwindigkeit [spm]
1,300 spm
Staubpinsel
Nadelsortiment
Netz für Oberfadenspulen
Staubschutzhauben
Zubehörbox

Tutorials

b48 + b44 + b42 Tutorial – Preparation (1/15)
Further information is available at http://www.mybernette.com Do you want to start using your b48, b44 or b42 for the first time? In our video tutorial, we show you the first steps. How do you attach and align the thread stand and the thread guide holder correctly? How do you connect the mains cable and the foot control, and where is the looper cover, as well as the accessories stored inside it? This basic information will help you get to know your overlocker and prepare for your first sewing project!
b48 + b44 + b42 Tutorial – Preparation (1/15)
b48 + b44 + b42 Tutorial – Rethreading (2/15)
Further information is available at http://www.mybernette.com In this video tutorial for your b48, b44 or b42, you will learn important basic information about rethreading, such as: when do you use the spool stabilizers? How can you tie directly onto threads for easy rethreading? How do you separate the thread chain, how do you pull the needle threads through first and then the separate looper threads?
b48 + b44 + b42 Tutorial – Rethreading (2/15)
b48 + b44 Tutorial – Overlock threading (3/15)
b48 + b44 Tutorial – Thread tension and overlock stitch optimization (5/15)
Further information is available at http://www.mybernette.com The appearance of the overlock stitches on your b48 or b44 is influenced by the type of fabric, the thread, the needles, stitch length and differential feed. To allow the threads to interlock loosely, first loosen one thread tension before you tighten another. In this video tutorial, we show you how to control and optimize the thread tension for the various types of overlock stitches. We show you what details you should consider for the following stitches: 4- and 3-thread overlock and 3-thread narrow seams, 3-thread roll hems, and 3-thread flatlock stitches.
b48 + b44 Tutorial – Thread tension and overlock stitch optimization (5/15)
b48 + b44 + b42 Tutorial – Stitch length and differential feed (7/15)
b48 + b44 Tutorial – Stitch width, cutting width, rolled hem (8/15)
b48 + b44 Tutorial – Upper looper converter (9/15)
b48 + b44 Tutorial – Basic overlock settings and sewing test (4/15)
Further information is available at http://www.mybernette.com With the help of this video, you can try out your first overlock stitch sewing test on your bernette 48 or bernette 44. What basic settings do you need to sew your first stitches? What do the thread tension, stitch length and differential feed do? How do you set the knife to the correct position, and how do you use the roll hem lever and presser foot pressure? When you have laid all the threads from the looper eye and the needle eye under the presser foot, lower the foot and you can slowly start to sew. The excess seam allowance is automatically cut off during the process.
b48 + b44 Tutorial – Basic overlock settings and sewing test (4/15)
b48 + b44 + b42 Tutorial – Changing the needles and needle threader (6/15)
Further information is available at http://www.mybernette.com This video tutorial shows you how to change the needles on your b48, b44 or b42, and how to use the needle threader. When you open the looper cover, you will find a needle holder and an appropriate screwdriver. To change a needle, first loosen the needle screw slightly. When you then wiggle the needle slightly, it will come out. Now insert the new needle into the needle clamp and push it all the way up into the correct position. You can then tighten the needle screw again. The video continues showing the use of the needle threader, which you orient with the notch up. You can then insert the thread horizontally and guide it along the needle groove with little pressure until the thread is guided through the needle eye. Now you can pull the thread through the eye of the needle with ease.
b48 + b44 + b42 Tutorial – Changing the needles and needle threader (6/15)
b48 + b44 + b42 Tutorial – Maintenance (15/15)
Further information is available at http://www.mybernette.com It is important to take a little time to regularly clean and maintain your b48, b44 or b42, because during sewing and cutting, fabric, thread and, of course, dust residues build up. In this video tutorial, we show you how to care for your bernette properly. When you open the looper cover, you will find a brush. In the accessory box you will also find a screwdriver and the overlock machine oil. The video shows you exactly how to remove the presser foot and the stitch plate to clean your machine in this area. We then show you which parts you can oil and what to do to make sure the oil is well distributed.
b48 + b44 + b42 Tutorial – Maintenance (15/15)