bernette 48 FUNLOCK

bernette 48 FUNLOCK
Art. Nr. 5240007106
895.00 CHF
Verfügbarkeit im Online Shop:
  • Verfügbar

bernette 48 FUNLOCK
Art. Nr. 5240007106
bernette 48 FUNLOCK image number

Produktbeschreibung


Beschreibung

Eine günstige Overlock- / Coverstich Maschine mit grossem Leistungsumfang und überzeugender Stichqualität

Besonderheiten

  • 2-, 3-, 4- und 5-Faden-Nähte
  • Breite Overlockstiche: 3-7 mm
  • Breite Coverstiche: 2,8 / 5,6 mm
  • Breite Combostiche: bis zu 10 mm
  • Breite Rollsaumstiche: 1,5 mm
  • Grosser Arbeitsbereich rechts der Nadeln: 87 mm
  • Helles LED-Licht
  • Nähgeschwindigkeit bis zu 1300 Stiche pro Minute
  • Differentialtransport stufenlos während des Nähens verstellbar
  • Einfaches Einfädeln durch farblich gekennzeichnete Einfädelwege
  • Manueller Nadeleinfädler
  • Zubehör im Greiferdeckel
  • Inklusive Stoffauffangbehälter

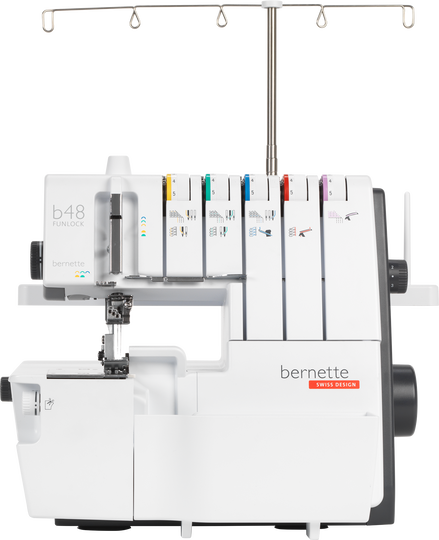
Eine Vielfalt an Stichen für schöne Nähte und Säume


Die bernette 48 FUNLOCK weist eine Vielfalt an Stichen auf: Ob Sicherheitsnähte oder Abschlüsse mit Overlockstichen, Coverstichen, Stichen wie Super Stretch für hochelastische Materialien, Flachnähte, Rollnähte, Rollsäume oder Kettenstichnähte – die Möglichkeiten Ihrer bernette 48 FUNLOCK sind nahezu grenzenlos.
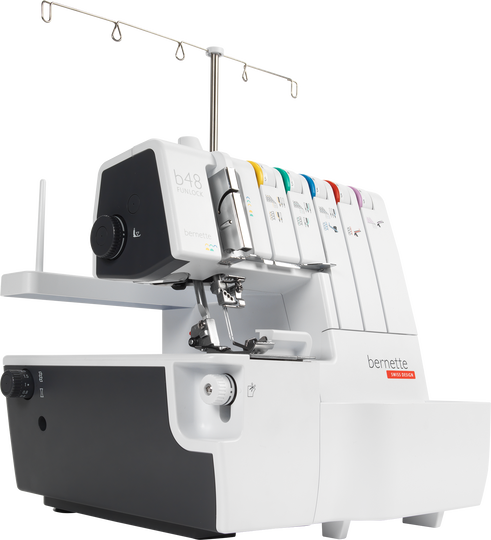
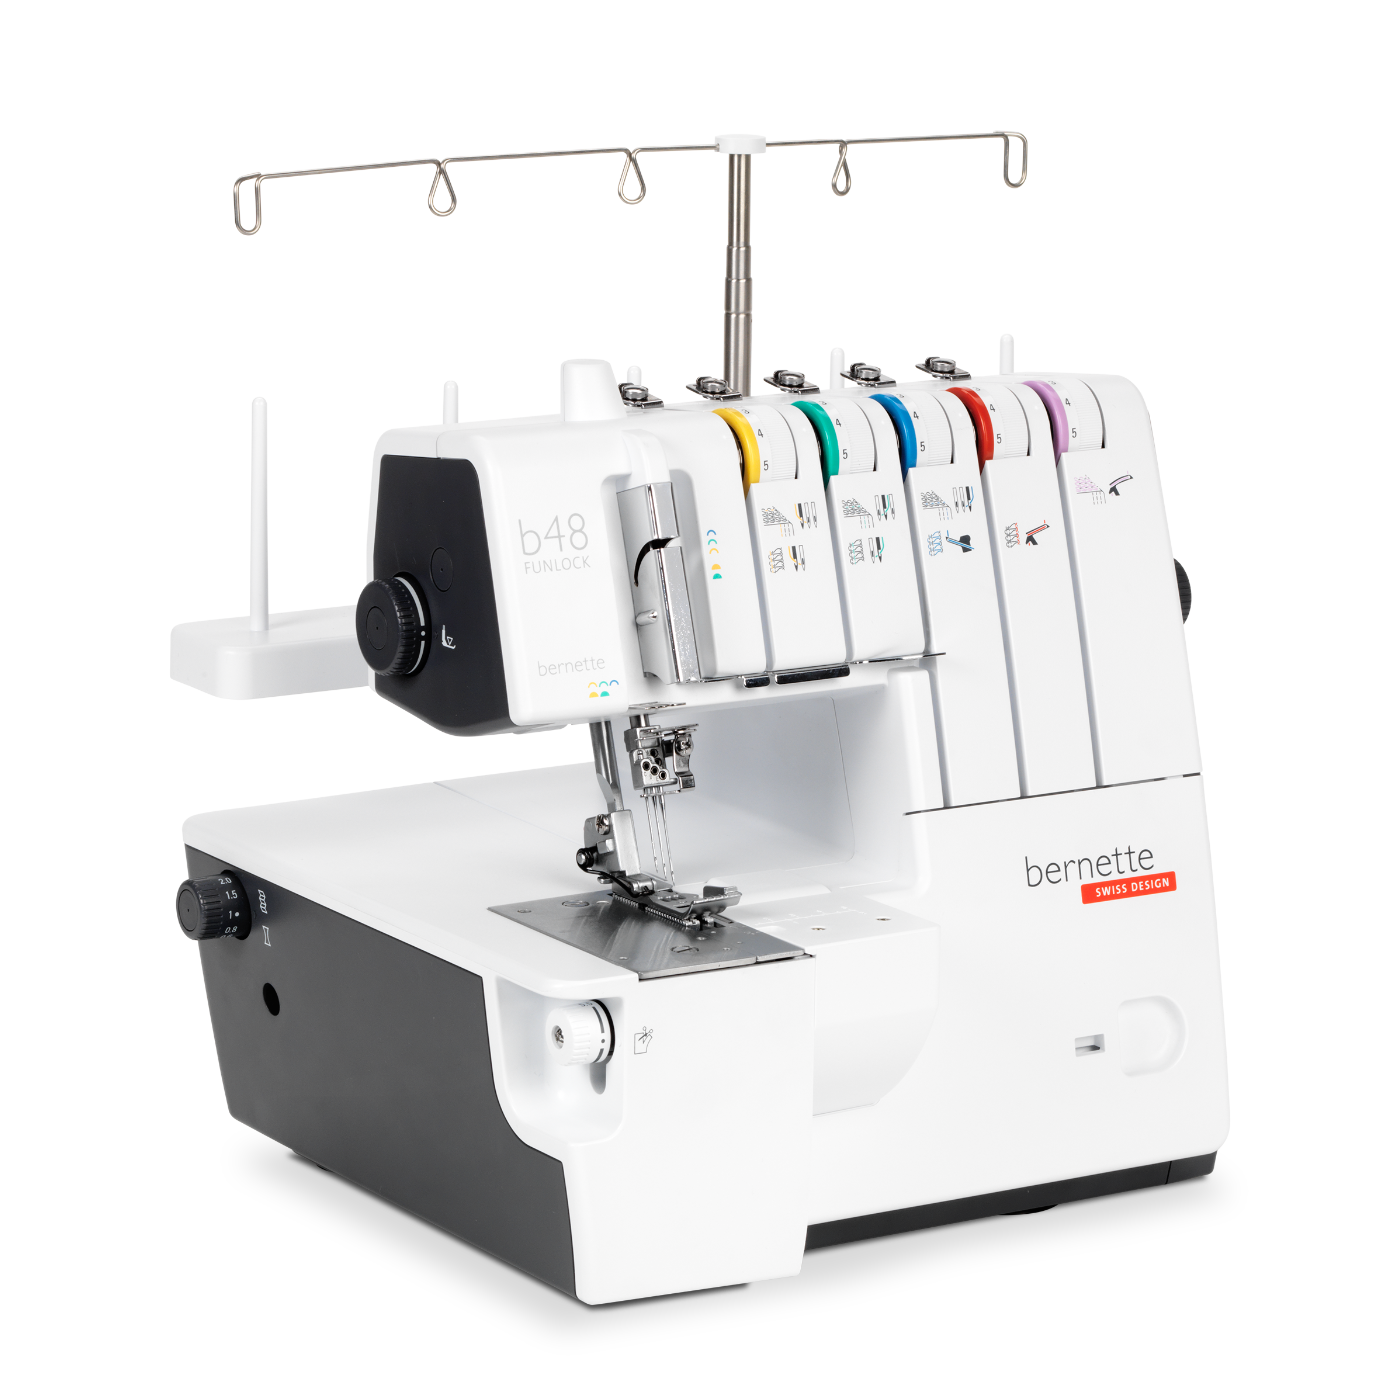
Einfaches Einfädeln


Folgen Sie den farbig markierten Einfädelwegen der bernette 48 FUNLOCK, wird das Einfädeln zu einem Kinderspiel. Separater Nadeleinfädler und Greifereinfädlemechanik erleichtern dies zusätzlich.

Grosser Arbeitsbereich für grosse Nähprojekte


Mit ihrem 87 mm grossen Arbeitsbereich bietet die bernette 48 FUNLOCK viel Platz für grössere Nähprojekte. Ein weiteres Highlight ist das helle LED-Licht, das den Bereich unter der Nadel stets gut ausleuchtet.

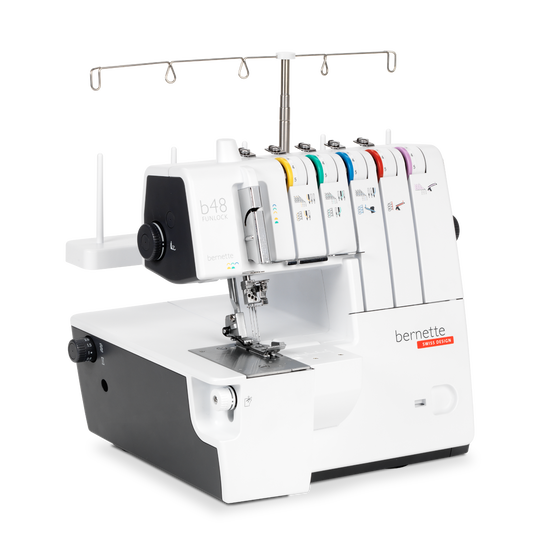
Hohe Nähgeschwindigkeit für effizientes Arbeiten


Die bernette 48 FUNLOCK ermöglicht sehr schnelles Nähen auf längeren Geraden. Mit bis zu 1300 Stichen pro Minute und präzisen Stichen nehmen Ihre Nähprojekte in kürzester Zeit Gestalt an.

Merkmale und Funktionen

bernette 48 FUNLOCK
Wichtig
Änderungen bezüglich Ausstattung und Ausführung bleiben vorbehalten.
Platz rechts neben der Nadel
87 mm
Stiche
23
Overlock-Stichbreite
3–7
Cover-Stichbreite
2,8/5,6
Combo-Stichbreite
5–10
Sicherheitsschalter bei geöffnetem Deckel
Farbcodierte, einheitliche Einfädelwege
Untergreifer-Einfädlerhebel
Max. Geschwindigkeit (Stiche/Minute)
1300 spm
Platz rechts neben der Nadel
87 mm
LED-Nählicht
2-stufiger Nähfusslifter mit Nähfussspitzen-Anhebung
Overlock-Stichbreite
3–7
Cover-Stichbreite
2,8/5,6
Combo-Stichbreite
5–10
Zubehör im Greiferdeckel
Untergreifer-Einfädlerhebel
Einheitliches Einfädeln
Farbcodierte, einheitliche Einfädelwege
Fadenspannungsauslösung
Einfädelschema
Sicherheitsschalter bei geöffnetem Deckel
Obergreiferabdeckung
Obergreifer-Ausschaltknopf
Coverstich-Abdeckung
Messerabdeckungseinsatz
Stiche
23
4-Faden Overlock mit integrierter Sicherheitsnaht
3-Faden Super Stretch
3-Faden Overlock breit (LN)
3-Faden Overlock schmal (RN)
3-Faden Flachnaht breit (LN)
3-Faden Flachnaht schmal (RN)
3-Faden Rollnaht
3-Faden Rollsaum
2-Faden Kantenumschlinger breit (LN)
2-Faden Kantenumschlinger schmal (RN)
2-Faden Flachnaht breit (LN)
2-Faden Flachnaht schmal (RN)
2-Faden Rollsaum
2-Faden Overlock breit (LN)
2-Faden Overlock schmal (RN)
4-Faden Coverstich
3-Faden Coverstich breit (LC-RC)
3-Faden Coverstich schmal (LC-CC)
2-Faden Kettenstich (CC)
3-Faden Overlock (LN) + 2-Faden Kettenstich (CC)
3-Faden Overlock (RN) + 2-Faden Kettenstich (CC)
2-Faden Overlock (LN) + 2-Faden Kettenstich (CC)
2-Faden Overlock (RN) + 2-Faden Kettenstich (CC)

Zubehör

Lassen Sie Ihrer Kreativität mit den mitgelieferten Zubehörteilen freien Lauf und stellen Sie sich mit einer Vielzahl von optionalen Zubehörteilen auf jede kreative Herausforderung ein

Tutorials

b48 + b44 + b42 Tutorial – Preparation (1/15)
Further information is available at http://www.mybernette.com Do you want to start using your b48, b44 or b42 for the first time? In our video tutorial, we show you the first steps. How do you attach and align the thread stand and the thread guide holder correctly? How do you connect the mains cable and the foot control, and where is the looper cover, as well as the accessories stored inside it? This basic information will help you get to know your overlocker and prepare for your first sewing project!
b48 + b44 + b42 Tutorial – Preparation (1/15)
b48 Tutorial – Basics of combo stitches (14/15)
b48 + b44 Tutorial – Basic overlock settings and sewing test (4/15)
Further information is available at http://www.mybernette.com With the help of this video, you can try out your first overlock stitch sewing test on your bernette 48 or bernette 44. What basic settings do you need to sew your first stitches? What do the thread tension, stitch length and differential feed do? How do you set the knife to the correct position, and how do you use the roll hem lever and presser foot pressure? When you have laid all the threads from the looper eye and the needle eye under the presser foot, lower the foot and you can slowly start to sew. The excess seam allowance is automatically cut off during the process.
b48 + b44 Tutorial – Basic overlock settings and sewing test (4/15)
b48 + b44 + b42 Tutorial – Stitch length and differential feed (7/15)
b48 + b44 Tutorial – Stitch width, cutting width, rolled hem (8/15)
b48 + b44 Tutorial – Upper looper converter (9/15)
b48 + b42 Tutorial – Coverstitch/chainstitch: basic settings and sewing test (11/15)
b48 Tutorial – Converting from overlock to coverstitch/chainstitch (13/15)
b48 + b44 + b42 Tutorial – Rethreading (2/15)
Further information is available at http://www.mybernette.com In this video tutorial for your b48, b44 or b42, you will learn important basic information about rethreading, such as: when do you use the spool stabilizers? How can you tie directly onto threads for easy rethreading? How do you separate the thread chain, how do you pull the needle threads through first and then the separate looper threads?
b48 + b44 + b42 Tutorial – Rethreading (2/15)
b48 + b44 Tutorial – Overlock threading (3/15)
b48 + b42 Tutorial – Coverstitch/chainstitch (10/15)
b48 + b44 + b42 Tutorial – Changing the needles and needle threader (6/15)
Further information is available at http://www.mybernette.com This video tutorial shows you how to change the needles on your b48, b44 or b42, and how to use the needle threader. When you open the looper cover, you will find a needle holder and an appropriate screwdriver. To change a needle, first loosen the needle screw slightly. When you then wiggle the needle slightly, it will come out. Now insert the new needle into the needle clamp and push it all the way up into the correct position. You can then tighten the needle screw again. The video continues showing the use of the needle threader, which you orient with the notch up. You can then insert the thread horizontally and guide it along the needle groove with little pressure until the thread is guided through the needle eye. Now you can pull the thread through the eye of the needle with ease.
b48 + b44 + b42 Tutorial – Changing the needles and needle threader (6/15)
b48 + b44 Tutorial – Thread tension and overlock stitch optimization (5/15)
Further information is available at http://www.mybernette.com The appearance of the overlock stitches on your b48 or b44 is influenced by the type of fabric, the thread, the needles, stitch length and differential feed. To allow the threads to interlock loosely, first loosen one thread tension before you tighten another. In this video tutorial, we show you how to control and optimize the thread tension for the various types of overlock stitches. We show you what details you should consider for the following stitches: 4- and 3-thread overlock and 3-thread narrow seams, 3-thread roll hems, and 3-thread flatlock stitches.
b48 + b44 Tutorial – Thread tension and overlock stitch optimization (5/15)
b48 + b42 Tutorial – Stitch optimisation for coverstitch and chainstitch (12/15)
b48 + b44 + b42 Tutorial – Maintenance (15/15)
Further information is available at http://www.mybernette.com It is important to take a little time to regularly clean and maintain your b48, b44 or b42, because during sewing and cutting, fabric, thread and, of course, dust residues build up. In this video tutorial, we show you how to care for your bernette properly. When you open the looper cover, you will find a brush. In the accessory box you will also find a screwdriver and the overlock machine oil. The video shows you exactly how to remove the presser foot and the stitch plate to clean your machine in this area. We then show you which parts you can oil and what to do to make sure the oil is well distributed.
b48 + b44 + b42 Tutorial – Maintenance (15/15)